1/72 Walrus II from Matchbox Kit
Mar 27, 2018 19:34:10 GMT 1
viscount, woody66, and 6 more like this
Post by acklington on Mar 27, 2018 19:34:10 GMT 1
This one has been over three weeks in the making so far, and still far from finished. I decided to adopt a very unusual method of construction, but wasn't sure if it would work or not. So didn't post work-in-progress photos for fear of having to abandon it half way thorough, with much egg on face.
I have an original Matchbox 1/72 kit of the Supermarine Walrus, but decided to use the later Revell re-issue of the kit, as it has better plastic, much less shrinkage on the parts, and comes with some of the stencil markings applied to the real Walrus. My chosen subject is an RAF Walrus Mk.II of 281 Squadron, circa 1942-43, based at RAF Ouston in Northumberland, and later at RAF Woolsington (now Newcastle Airport). And then the difficulties started! There are loads of photos and markings for FAA Walrus Mk.1 aircraft, but very little of any quality for the RAF version. The two preserved Walrus Mk.Is at Hendon (an Aussie Seagull) and Yeovilton are both metal hulled ex Navy examples, and seem to differ in many details from the RAF wooden hulled Mk.II. Reliable colour scheme information for the RAF machines is scant, and various 3-view drawings and side view profiles all lack essential detail, or are just wrong.
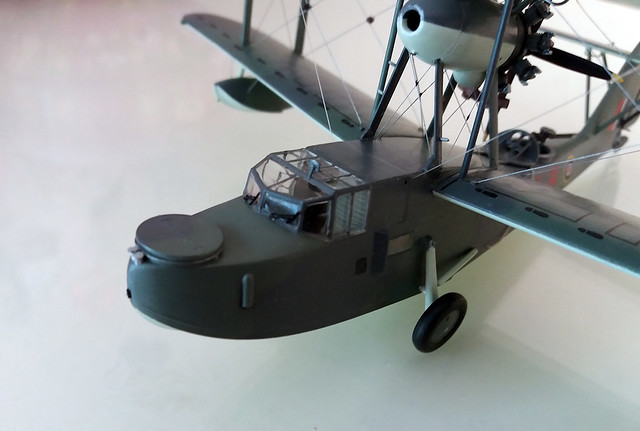
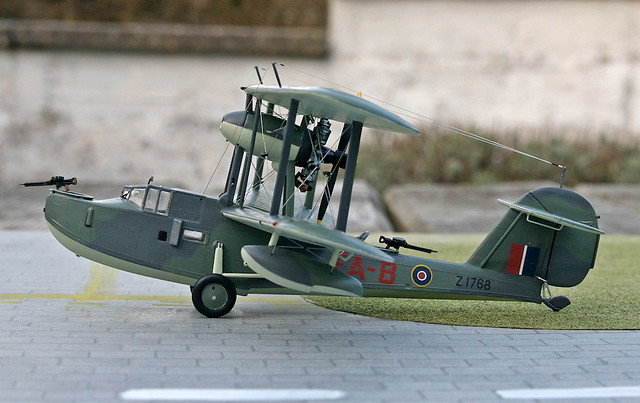
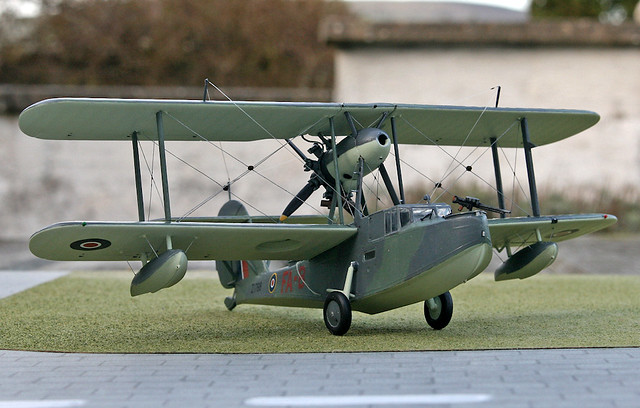
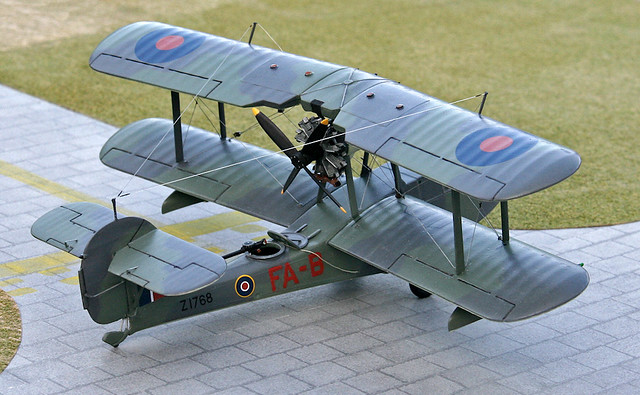
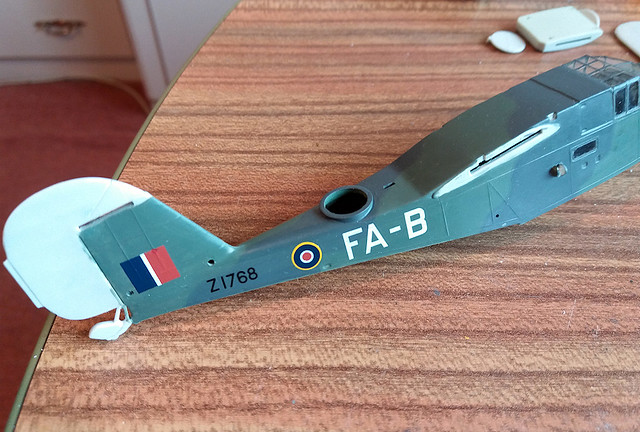
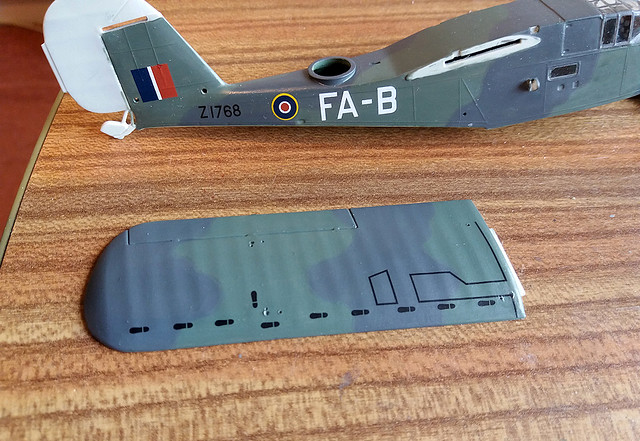
 Walrus II, Z1768, 281 Sqdn, Ouston, 1942-3 (1) w by Philip Pain, on Flickr
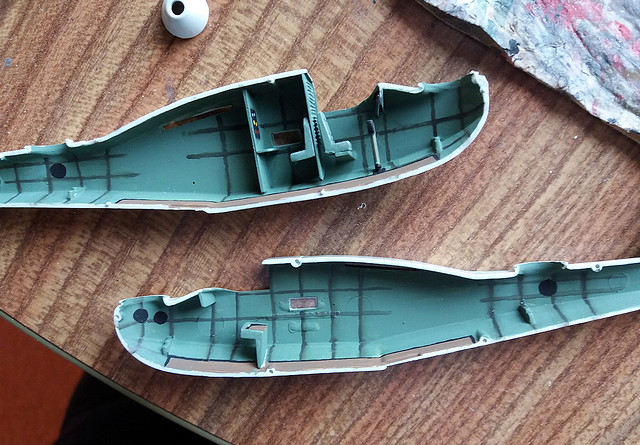
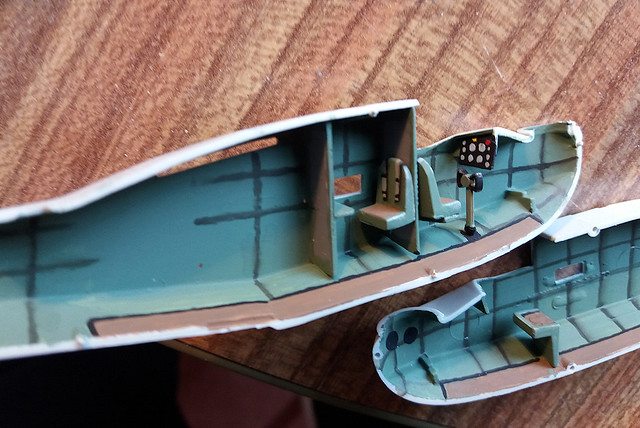
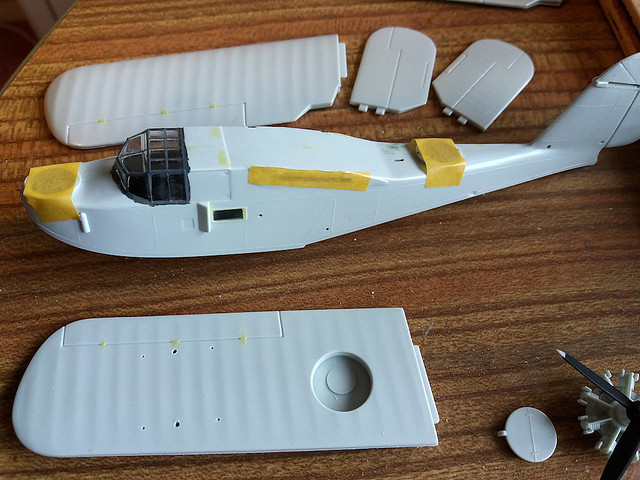
Started with the interior, which contained nothing, other than 3 crude seats. Didn't put too much effort in to it, as not much will be visible. The two side window positions were cut out and glazed.
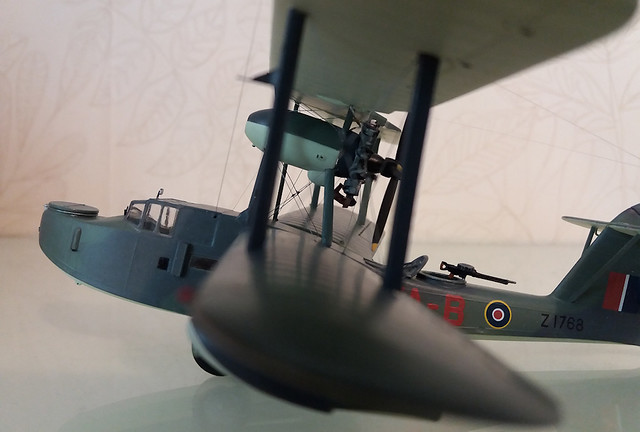
 Walrus II, Z1768, 281 Sqdn, Ouston, 1942-3 (2) w by Philip Pain, on Flickr
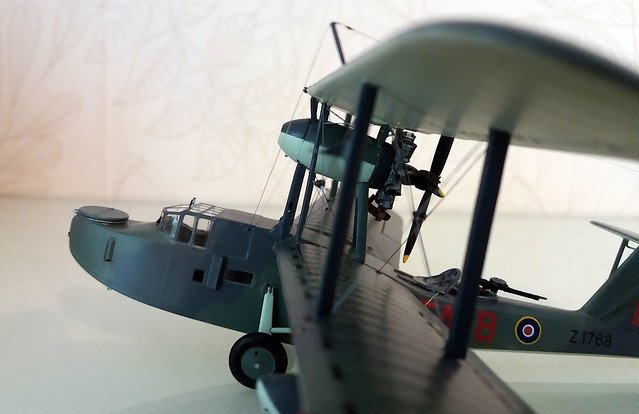
 Walrus II, Z1768, 281 Sqdn, Ouston, 1942-3 (3) w by Philip Pain, on Flickr
All scratch built, apart from the control column from an Airfix Anson.
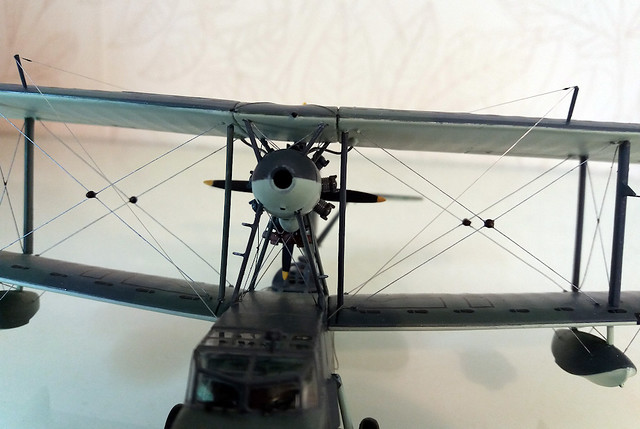
 Walrus II, Z1768, 281 Sqdn, Ouston, 1942-3 (4) w by Philip Pain, on Flickr
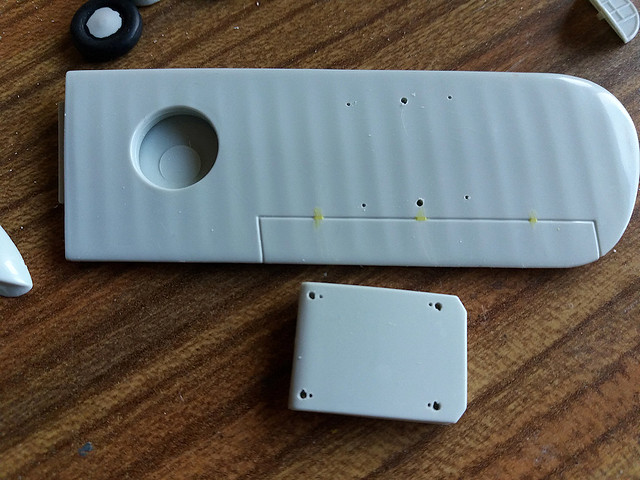
Drilled holes for the rigging wires, and also used putty to create the missing aileron hinges. The Matchboc/Revell kit is reasonably accurate, but almost completely devoid of all the little details.
 Walrus II, Z1768, 281 Sqdn, Ouston, 1942-3 (5) w by Philip Pain, on Flickr
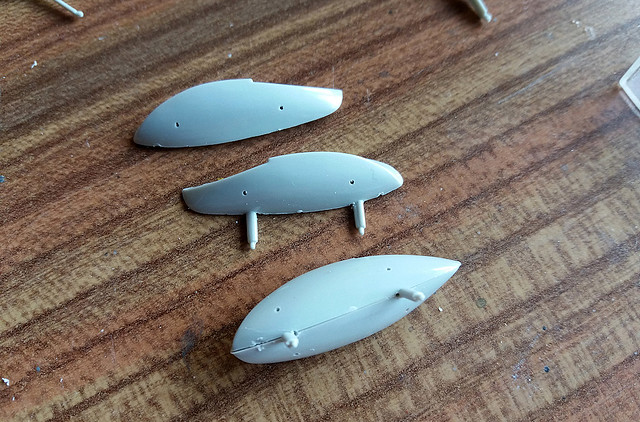
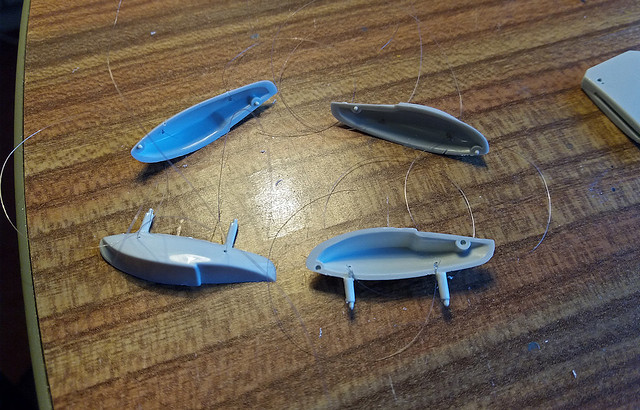
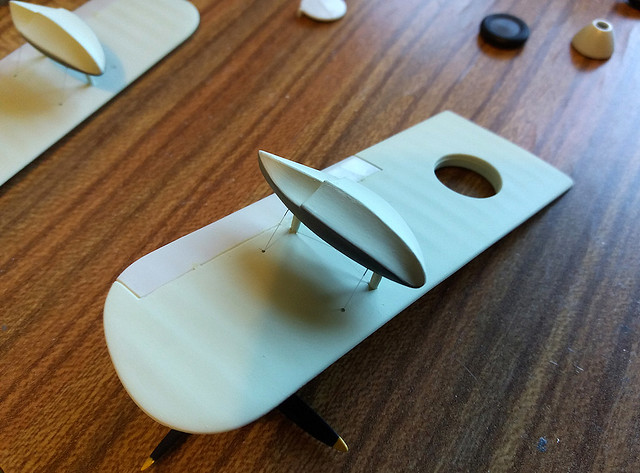
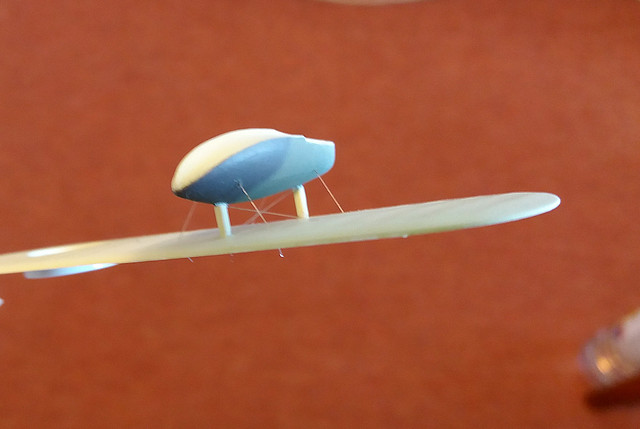
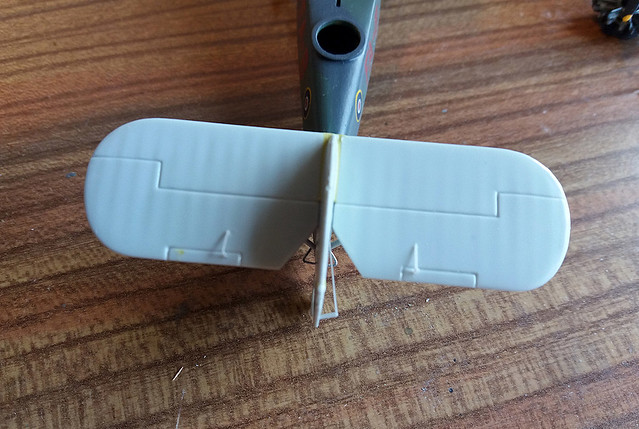
Also drilled rigging holes in the wing floats.
 Walrus II, Z1768, 281 Sqdn, Ouston, 1942-3 (6) w by Philip Pain, on Flickr
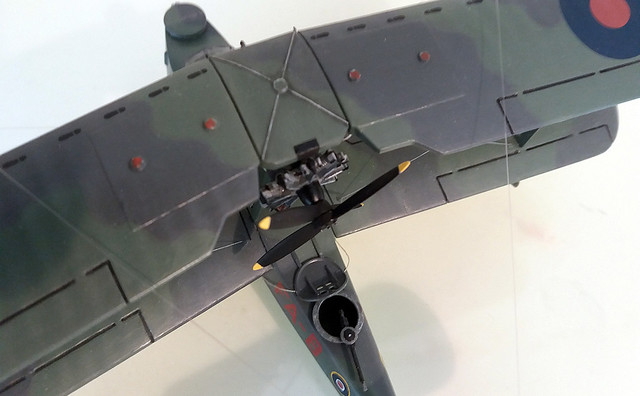
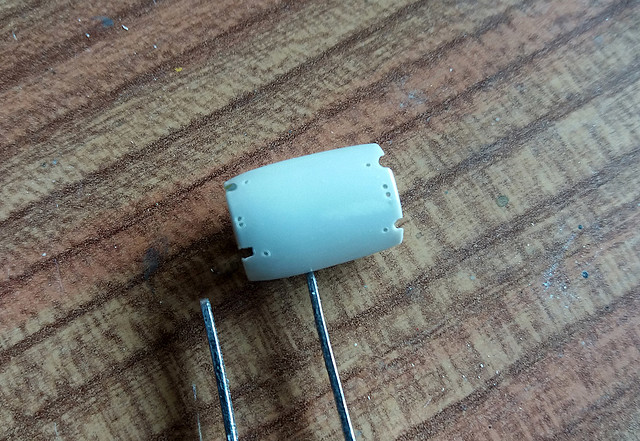
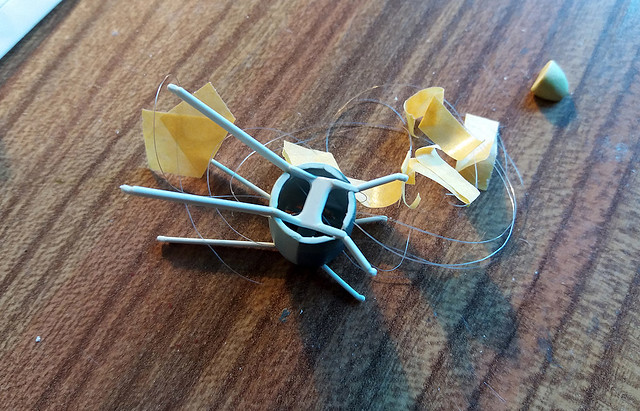
The engine nacelle with some of the 16 holes drilled in it!
 Walrus II, Z1768, 281 Sqdn, Ouston, 1942-3 (7) w by Philip Pain, on Flickr
The fuselage together, with filler applied and sanded.
 Walrus II, Z1768, 281 Sqdn, Ouston, 1942-3 (8) w by Philip Pain, on Flickr
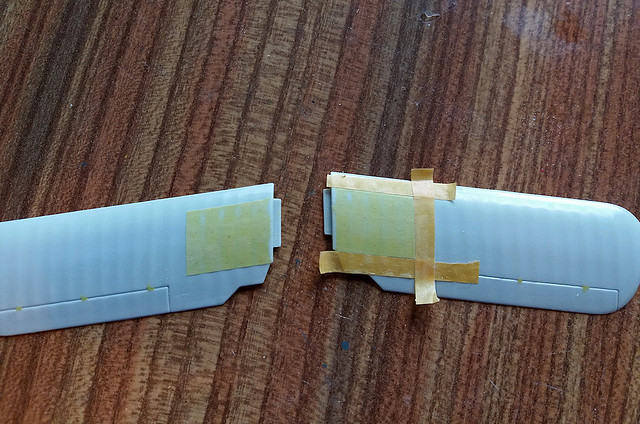
This is my unusual construction technique for this model - anchoring the rigging inside the parts, before gluing the bits together.
 Walrus II, Z1768, 281 Sqdn, Ouston, 1942-3 (9) w by Philip Pain, on Flickr
Same for the engine nacelle and associated struts. The bits of tape are to stop the rigging falling out, and to keep the correct rigging ends together. I did lose the plot several times, it was very complex!
 Walrus II, Z1768, 281 Sqdn, Ouston, 1942-3 (10) w by Philip Pain, on Flickr
 Walrus II, Z1768, 281 Sqdn, Ouston, 1942-3 (11) w by Philip Pain, on Flickr
Unusual construction continues, with the floats painted, attached and fully rigged, before the painted lower wing half is glued to the top half.
 Walrus II, Z1768, 281 Sqdn, Ouston, 1942-3 (12) w by Philip Pain, on Flickr
I've never before painted, decaled and varnished a fuselage before attaching anything to it. Also, couldn't find correct sized dull-red code letters, so applied white ones, to be over painted after in dull red.
 Walrus II, Z1768, 281 Sqdn, Ouston, 1942-3 (13) w by Philip Pain, on Flickr
This is the top surface of the lower wing, again fully painted, decaled and varnished, before joining to the lower wing half. Much time also spent agonising over whether or not to apply 'shadow shading' to the lower wing surface (i.e. lighter shades to compensate for the dark shadow created by the upper wing). However, shadow shading was officially discontinued in 1942, so I concluded that new-built RAF Walrus aircraft were unlikely to have it.
 Walrus II, Z1768, 281 Sqdn, Ouston, 1942-3 (14) w by Philip Pain, on Flickr
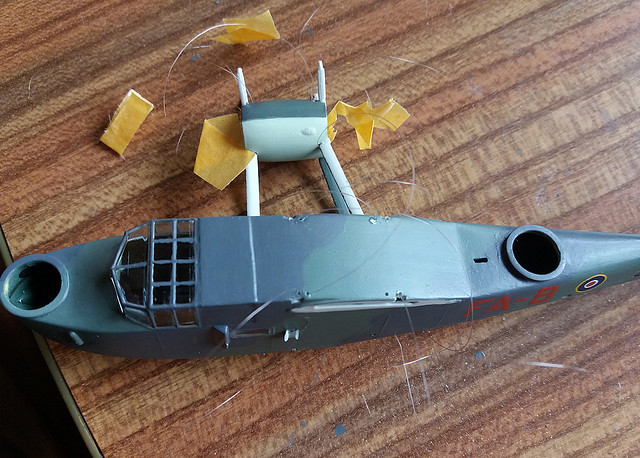
Here is the engines nacelle and struts having the rigging wires glued to the fuselage, before attaching the plastic parts. The rigging would subsequently be pulled tight and glued. I would do this differently next time, and attached the rigging from inside the fuselage for greater strength and less visible super glue.
 Walrus II, Z1768, 281 Sqdn, Ouston, 1942-3 (15) w by Philip Pain, on Flickr
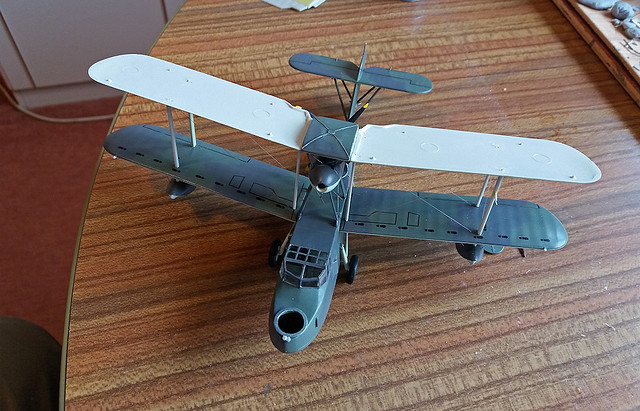
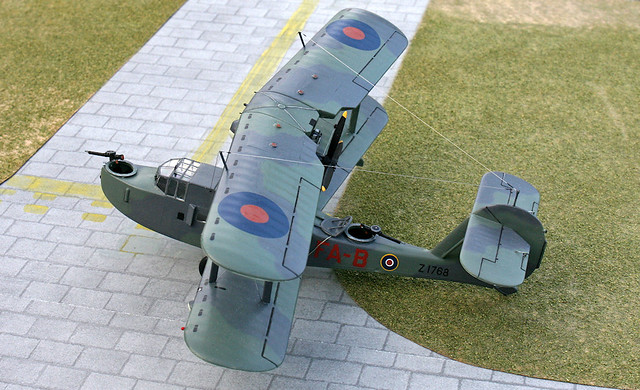
Having attached the engine nacelle & struts, the tailplanes were attached next in order to give a 'level datum' for the splayed undercarraige legs. This didn't work as planned and one wheel had to be prised off and re-attached to try and level the model. The u/c legs on the model have very weak attachments, and this didn't seem to make sense for the real aircraft either. It was only after carefully studying photos of the real aircraft that it was discovered that there are in fact two very small struts on the back face of the undercarraige legs, and these lock on to the fuselage when the wheels are down. They are invisible in most photos, and completely absent from all 3-view plans!
 Walrus II, Z1768, 281 Sqdn, Ouston, 1942-3 (16) w by Philip Pain, on Flickr
The lower surface of the wing centre section was then attached, and the rigging pulled through and super glued. But not before much difficulty in trying to get the centre section 'straight and level'. This involved much bending of the struts which did not align properly, and it was not caused by the 3-degree offset on the engine nacelle.
 Walrus II, Z1768, 281 Sqdn, Ouston, 1942-3 (17) w by Philip Pain, on Flickr
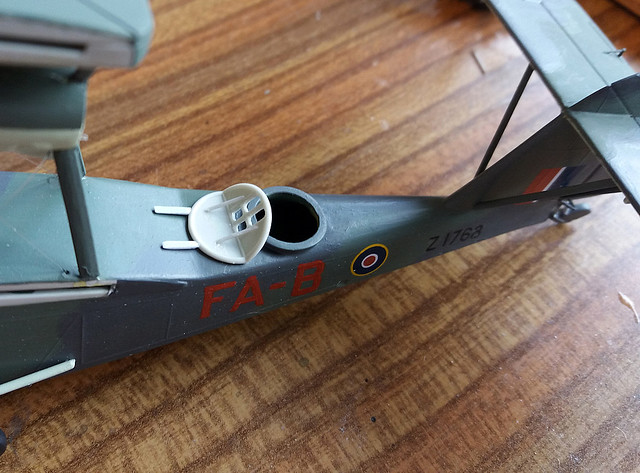
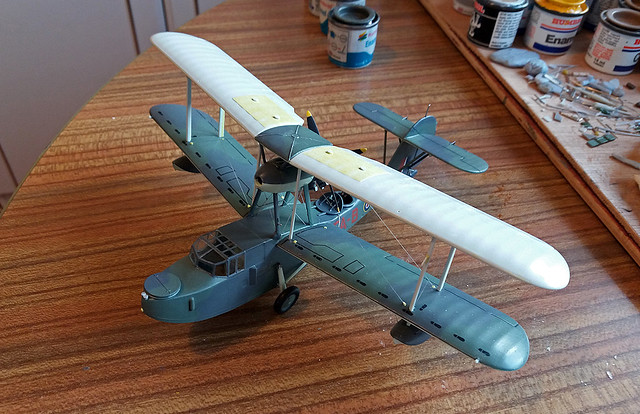
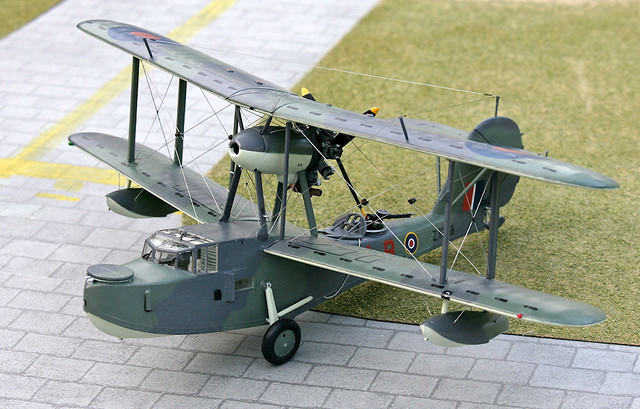
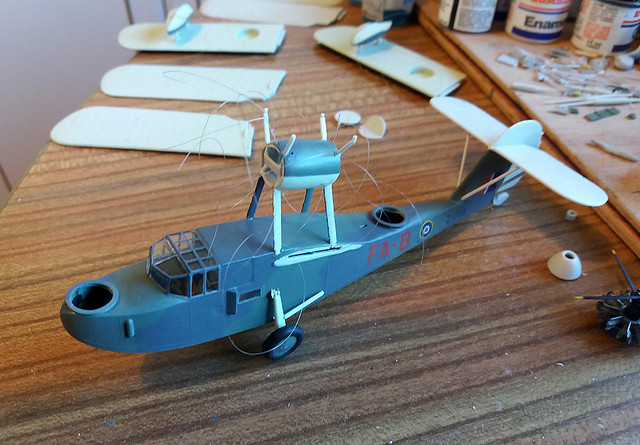
Then the top surface of the wing centre section was glued in place. It is perhaps debatable whether or not RAF Walrus had the four-wire sling on this top surface, as there would not normally be any requirement to hoist RAF Walrus back onto ships? Also regarding the top of the canopy, at least one of the preserved museum Walrus aircraft has only two (thicker) frames, rather than the three depicted on the model. Published plans and 3-view drawings are no help in resolving this. Finally, a late 'discovery' was that the kit wrongly has a second bilge pump pipe on the starboard nose, so this was removed and the paint repaired on that side.
 Walrus II, Z1768, 281 Sqdn, Ouston, 1942-3 (18) w by Philip Pain, on Flickr
 Walrus II, Z1768, 281 Sqdn, Ouston, 1942-3 (19) w by Philip Pain, on Flickr
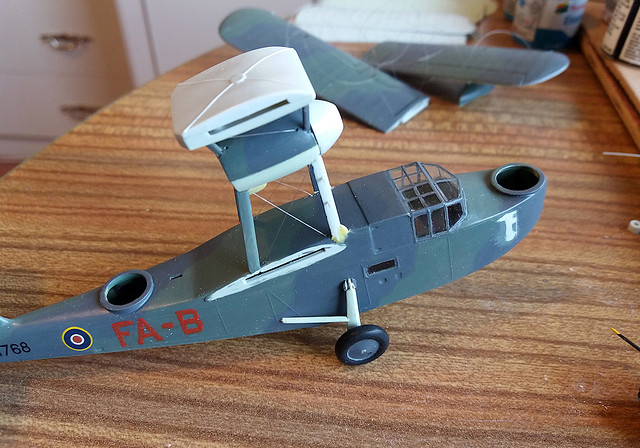
The kit's tail feathers are devoid of the various actuating rods, so these were scratch built and added.
 Walrus II, Z1768, 281 Sqdn, Ouston, 1942-3 (20) w by Philip Pain, on Flickr
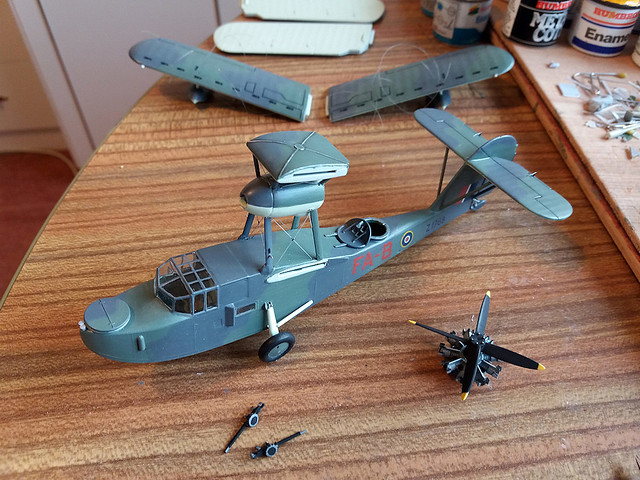
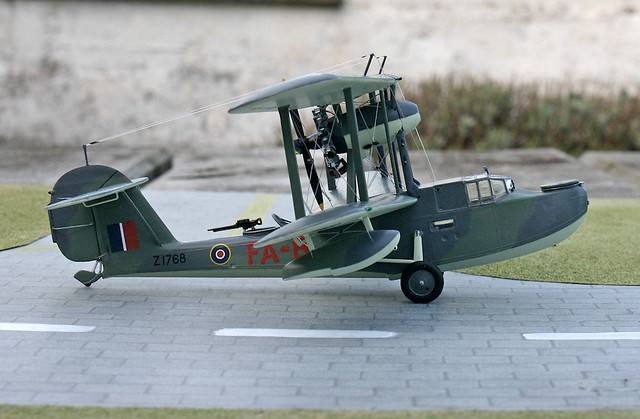
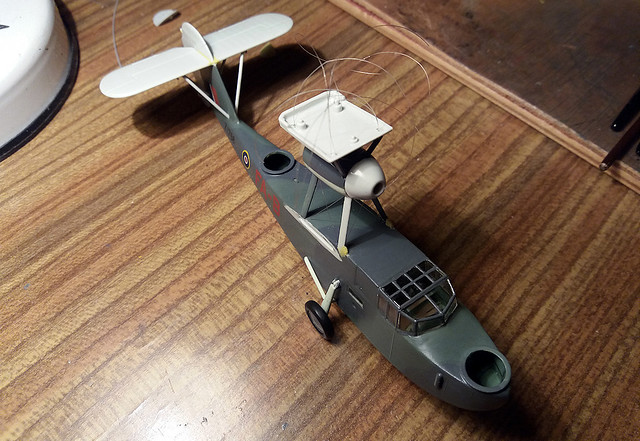
More missing details include the faired lower front struts, and the prominent blister under the rear of the engine nacelle. This is assumed to be some sort of 'sea spray guard' for the lower engine cylinders?
That's all so far, but more to follow ..............
I have an original Matchbox 1/72 kit of the Supermarine Walrus, but decided to use the later Revell re-issue of the kit, as it has better plastic, much less shrinkage on the parts, and comes with some of the stencil markings applied to the real Walrus. My chosen subject is an RAF Walrus Mk.II of 281 Squadron, circa 1942-43, based at RAF Ouston in Northumberland, and later at RAF Woolsington (now Newcastle Airport). And then the difficulties started! There are loads of photos and markings for FAA Walrus Mk.1 aircraft, but very little of any quality for the RAF version. The two preserved Walrus Mk.Is at Hendon (an Aussie Seagull) and Yeovilton are both metal hulled ex Navy examples, and seem to differ in many details from the RAF wooden hulled Mk.II. Reliable colour scheme information for the RAF machines is scant, and various 3-view drawings and side view profiles all lack essential detail, or are just wrong.
Walrus II, Z1768, 281 Sqdn, Ouston, 1942-3 (1) w by Philip Pain, on FlickrStarted with the interior, which contained nothing, other than 3 crude seats. Didn't put too much effort in to it, as not much will be visible. The two side window positions were cut out and glazed.
Walrus II, Z1768, 281 Sqdn, Ouston, 1942-3 (2) w by Philip Pain, on FlickrWalrus II, Z1768, 281 Sqdn, Ouston, 1942-3 (3) w by Philip Pain, on FlickrAll scratch built, apart from the control column from an Airfix Anson.
Walrus II, Z1768, 281 Sqdn, Ouston, 1942-3 (4) w by Philip Pain, on FlickrDrilled holes for the rigging wires, and also used putty to create the missing aileron hinges. The Matchboc/Revell kit is reasonably accurate, but almost completely devoid of all the little details.
Walrus II, Z1768, 281 Sqdn, Ouston, 1942-3 (5) w by Philip Pain, on FlickrAlso drilled rigging holes in the wing floats.
Walrus II, Z1768, 281 Sqdn, Ouston, 1942-3 (6) w by Philip Pain, on FlickrThe engine nacelle with some of the 16 holes drilled in it!
Walrus II, Z1768, 281 Sqdn, Ouston, 1942-3 (7) w by Philip Pain, on FlickrThe fuselage together, with filler applied and sanded.
Walrus II, Z1768, 281 Sqdn, Ouston, 1942-3 (8) w by Philip Pain, on FlickrThis is my unusual construction technique for this model - anchoring the rigging inside the parts, before gluing the bits together.
Walrus II, Z1768, 281 Sqdn, Ouston, 1942-3 (9) w by Philip Pain, on FlickrSame for the engine nacelle and associated struts. The bits of tape are to stop the rigging falling out, and to keep the correct rigging ends together. I did lose the plot several times, it was very complex!
Walrus II, Z1768, 281 Sqdn, Ouston, 1942-3 (10) w by Philip Pain, on FlickrWalrus II, Z1768, 281 Sqdn, Ouston, 1942-3 (11) w by Philip Pain, on FlickrUnusual construction continues, with the floats painted, attached and fully rigged, before the painted lower wing half is glued to the top half.
Walrus II, Z1768, 281 Sqdn, Ouston, 1942-3 (12) w by Philip Pain, on FlickrI've never before painted, decaled and varnished a fuselage before attaching anything to it. Also, couldn't find correct sized dull-red code letters, so applied white ones, to be over painted after in dull red.
Walrus II, Z1768, 281 Sqdn, Ouston, 1942-3 (13) w by Philip Pain, on FlickrThis is the top surface of the lower wing, again fully painted, decaled and varnished, before joining to the lower wing half. Much time also spent agonising over whether or not to apply 'shadow shading' to the lower wing surface (i.e. lighter shades to compensate for the dark shadow created by the upper wing). However, shadow shading was officially discontinued in 1942, so I concluded that new-built RAF Walrus aircraft were unlikely to have it.
Walrus II, Z1768, 281 Sqdn, Ouston, 1942-3 (14) w by Philip Pain, on FlickrHere is the engines nacelle and struts having the rigging wires glued to the fuselage, before attaching the plastic parts. The rigging would subsequently be pulled tight and glued. I would do this differently next time, and attached the rigging from inside the fuselage for greater strength and less visible super glue.
Walrus II, Z1768, 281 Sqdn, Ouston, 1942-3 (15) w by Philip Pain, on FlickrHaving attached the engine nacelle & struts, the tailplanes were attached next in order to give a 'level datum' for the splayed undercarraige legs. This didn't work as planned and one wheel had to be prised off and re-attached to try and level the model. The u/c legs on the model have very weak attachments, and this didn't seem to make sense for the real aircraft either. It was only after carefully studying photos of the real aircraft that it was discovered that there are in fact two very small struts on the back face of the undercarraige legs, and these lock on to the fuselage when the wheels are down. They are invisible in most photos, and completely absent from all 3-view plans!
Walrus II, Z1768, 281 Sqdn, Ouston, 1942-3 (16) w by Philip Pain, on FlickrThe lower surface of the wing centre section was then attached, and the rigging pulled through and super glued. But not before much difficulty in trying to get the centre section 'straight and level'. This involved much bending of the struts which did not align properly, and it was not caused by the 3-degree offset on the engine nacelle.
Walrus II, Z1768, 281 Sqdn, Ouston, 1942-3 (17) w by Philip Pain, on FlickrThen the top surface of the wing centre section was glued in place. It is perhaps debatable whether or not RAF Walrus had the four-wire sling on this top surface, as there would not normally be any requirement to hoist RAF Walrus back onto ships? Also regarding the top of the canopy, at least one of the preserved museum Walrus aircraft has only two (thicker) frames, rather than the three depicted on the model. Published plans and 3-view drawings are no help in resolving this. Finally, a late 'discovery' was that the kit wrongly has a second bilge pump pipe on the starboard nose, so this was removed and the paint repaired on that side.
Walrus II, Z1768, 281 Sqdn, Ouston, 1942-3 (18) w by Philip Pain, on FlickrWalrus II, Z1768, 281 Sqdn, Ouston, 1942-3 (19) w by Philip Pain, on FlickrThe kit's tail feathers are devoid of the various actuating rods, so these were scratch built and added.
Walrus II, Z1768, 281 Sqdn, Ouston, 1942-3 (20) w by Philip Pain, on FlickrMore missing details include the faired lower front struts, and the prominent blister under the rear of the engine nacelle. This is assumed to be some sort of 'sea spray guard' for the lower engine cylinders?
That's all so far, but more to follow ..............